
Guest Post: Implementing the Bored Ape Yacht Club smart contract in Cadence

Hey, Jacob Tucker here.
In this post, I will walk you through how I implemented the BoredApeYachtClub NFT smart contract in Cadence, the smart contract language used by the Flow blockchain and popular platforms like NBA Top Shot and Ticketmaster.
Architectural Differences of Defining NFTs in Solidity & Cadence
Solidity is the smart contract language that the BAYC smart contract is written in. Below I will highlight key differences between the two languages.
Storage
In Solidity smart contracts act as a central ledger that stores assets themselves. An NFT contract in Solidity looks something like this:

As you can see, NFTs are stored as a simple mapping from `nft id` => `owner address`. The NFT itself is not an asset or even an object, rather it is literally a number that sits in the contract.
The issue with this approach is it is extremely fragile. This is because Solidity behaves like any general-purpose programming language in how variables are handled. There are no special types for NFTs; rather they are represented as integers which puts the responsibility on the developer to ensure nothing goes wrong.
Because of the “resource-oriented” model of Cadence, NFTs are represented as actual objects that get moved around. Assets are not allowed to be lost; if a developer forgets to store a resource somewhere or destroy it, Cadence will fail at compile time and not allow you to run that code.
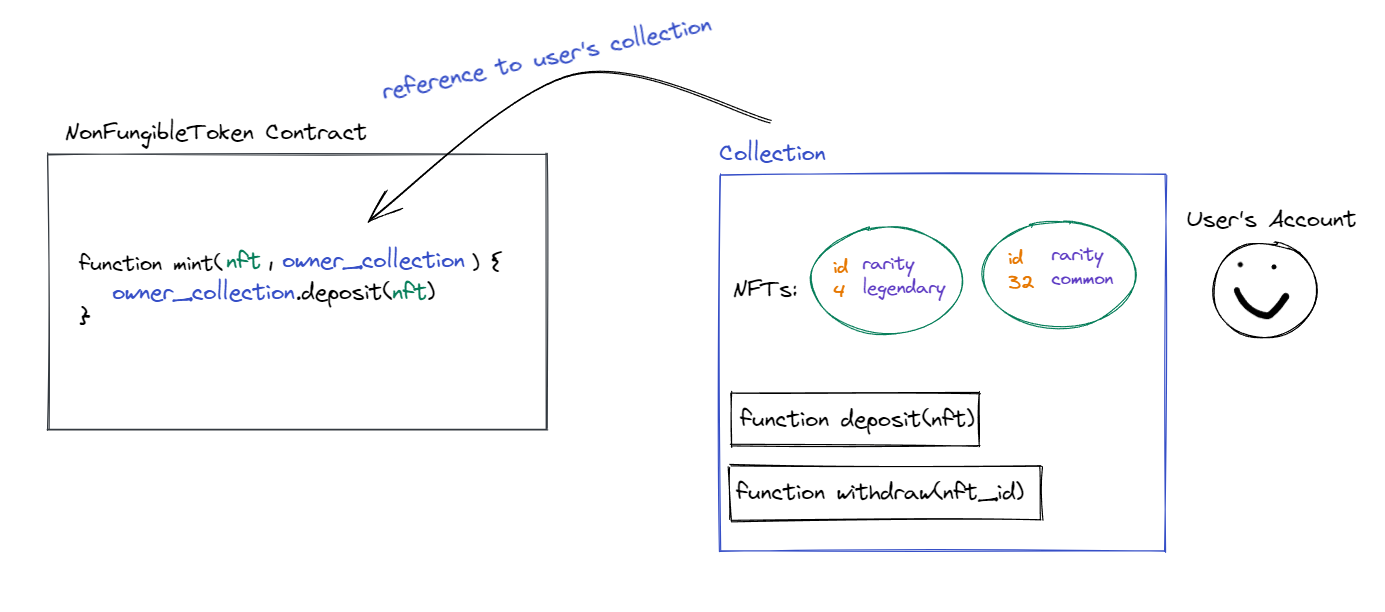
Additionally, Cadence provides users true ownership over their assets. Instead of the smart contract storing a mapping of data in the contract, Cadence has users store NFT collections (and all other data) inside their own accounts. This way, users have complete control over their assets. An NFT contract in Cadence looks something like this:
Access Control
Another key difference we will encounter is how we restrict certain functions to certain people.
For example, how do we make sure the mint function is only callable by the owner? In Solidity, you use a combination of OpenZeppelin’s Ownable contract and function modifiers to do this like so:

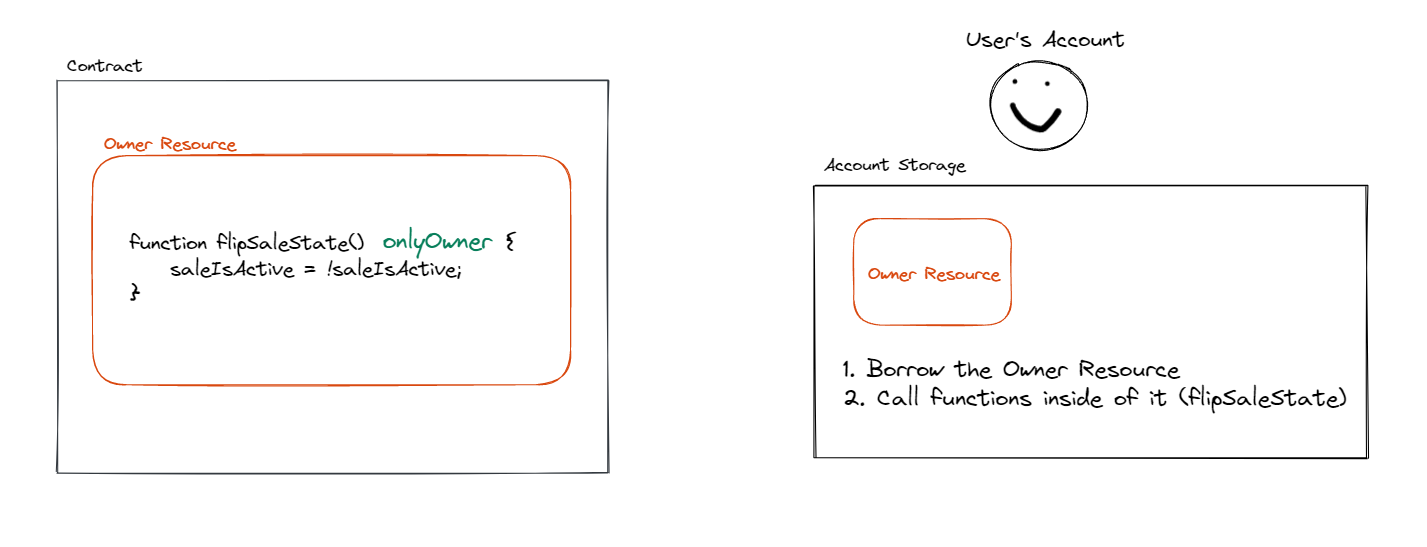
Cadence however has built-in access control through the use of resources, access modifiers, and capabilities. We can define a resource (object) called Owner and store it in the owner’s account storage, allowing them to borrow a reference to it and flip the sale state at any time and removing the need for 3rd party libraries like OpenZeppelin. It looks something like this:
Re-writing BAYC from Solidity to Cadence
Before reading on, if you’d like to skip right to the code, see this GitHub repo containing both contracts and associated Cadence transactions/scripts.
Implementing the NFT Standard
It is important to understand that the BAYC contract is an NFT contract, and thus implements the NFT-standard (or “ERC-721”) contract in Solidity. The way this works is the BAYC contract inherits a ton of default behavior like minting, storage, and more from the ERC-721 contract. It also adds some of its own, BAYC specific, functionality on top.
With this in mind, the first step to re-writing the contract is to implement a default implementation of the NFT-standard (or “NonFungibleToken”) contract interface in Cadence. Instead of simply inheriting from the ERC-721 contract like you do in Solidity, you must explicitly define all “NonFungibleToken” required code in your new contract.
Check out this bare-minimum contract that implements the “NonFungibleToken” interface:
What are the main features of this contract? Well, most importantly, you can see we have a “resource” called NFT. In Cadence, resources represent objects that we can move and store. In this case, it represents an asset named NFT that we will mint and store in users accounts.
Next we have a resource named “Collection”. This represents an object that will store NFT assets inside of it. Instead of storing individual NFTs in a user's account, we will instead store a whole Collection that contains the NFTs themselves. This will make it much easier to discover all of our BAYC NFTs because they will live in one place.
The Collection resource itself has a few functions inside of it: deposit and withdraw (which are self explanatory), getIDs (to read the ids of the NFTs someone owns), and borrowApeNFT (to discover basic metadata of an NFT).
The “paths” you see in this contract, namely CollectionStoragePath and CollectionPublicPath, describe where in the account you’ll be able to find the Collection resource once we store it.

Everything else like totalSupply and the few events, must be included to abide by the NonFungibleToken interface. This line, defined in the init function of the NFT resource, will make sure the totalSupply is incremented every time an NFT is created:
To learn more about implementing an official NFT contract in Cadence, check out Emerald Academy’s Beginner Cadence course which does exactly that.
Minting Functionality
Now that we have covered implementing the NFT standard, let's add the rest of the contract.
The next most important step is re-writing minting. This is the minting function in the Solidity contract:
The first step of the minting function is to make sure some checks are true:
- Checks to make sure the sale is active
- Doesn’t allow the user to mint more than the max amount allowed
- Ensures the total supply will not exceed the max apes allowed
- Makes sure the amount of Ether passed in equals the (price * quantity) of the apes being bought.
Then, it runs a loop that calls the mint function with the sender’s address and an incremental id that will represent each NFT.
To implement this in Cadence, we’ll need to define some variables to run our checks, and then a mint function:
There are a few differences here. First, we use something called “pre-conditions” to assert conditions are true before the function even starts. This is a native feature to Cadence to ensure correct behavior.
Next, we run a loop that uses a passed-in reference to the buyer’s BAYC collection and deposit the apes there. So, instead of simply mapping an NFT’s id to an owner’s address, we are passing in a reference to the buyer’s NFT collection and literally moving an asset into the collection.
Another key difference is that in Solidity, the Ether (or payment) is passed to the contract. In Cadence, we pass the payment in as yet another resource and transfer that payment to the owner’s vault.
Notice we had to give the variables default values in the init function. I set them to the exact same default variables as they do in Solidity here:
Metadata
The biggest difference between Solidity and Cadence is how we handle metadata. In Solidity, metadata is stored off-chain in things like IPFS, a decentralized storage network. DApps then use a “uri” to fetch different NFTs metadata based on their ids.
In Cadence, besides images or other heavy metadata, most metadata is stored on-chain. This is fantastic for composability and other things like verifying metadata directly in our contracts that you can’t do in Solidity. The only issue will be hiding our metadata upon minting. If the blockchain is public, and metadata is on-chain, how do we prevent users from accessing the data of NFTs while minting?
Well, it turns out the answer is quite easy: upload metadata after users have minted! This is exactly how it’s done in Solidity anyways by changing the “uri” after users have minted.
To do this, we must define two things:
- An Owner resource that will allow the owner to upload metadata and flip the sale state. This resource will get stored in the owner’s account to access these functions.
- A Template struct that the Owner can use to upload metadata when they like using the fulfillMetadata function. We will use the serial of the NFT (an incremental id from 0) to map to the Template data:
We then create an Owner resource and store it in the contract deployer’s account during the init function of the contract:
This will allow the owner to borrow the Owner resource from their account at any time and fulfill metadata or flip the sale state. Again, we do not need any 3rd party libraries like OpenZeppelin to manage access control over our owner functions.
Conclusion
The NFT Standards discussed today are very different. While Solidity represents ownership by mapping an integer to an address, Cadence takes a more intuitive approach with a resource-oriented model by depositing unlosable objects into collections that users store and control.
Furthermore, the security mechanisms of Cadence through its built-in access control and strongly typed syntax makes it very hard for the developer to mess up, which is crucial when dealing with assets as valuable as Bored Apes.
I strongly encourage you to try out Cadence and even map some of your own favorite Solidity contracts to Cadence. If you’re interested in learning the language from 0 experience, check out Emerald Academy’s Beginner Cadence course.
To access the final smart contracts, go here.