

.png)
Overview
This article will cover different tools and technologies you can use to help build on Flow blockchain. As the article focuses on tools, we assume you already have a basic understanding of Cadence. If not, you are welcome to take a tutorial on Cadence https://developers.flow.com/cadence/tutorial/01-first-steps
There will be a lot of topics and technologies we will cover, so we have to assume you have a basic understanding of these technologies:
- Cadence programming language
- Public Private Keys
- Flow Blockchain
But don't worry if you need clarification on some areas; we will provide handy links you can follow to learn more about it as we go through the process.
The purpose of this guide is to familiarize you with the flow of Flow, meaning which tools you need and which steps you need to take, from starting to develop an application locally to the production deployment on Mainnet.
⏱️ Read time is approx 30 minutes, so make your coffee now and follow along.
1-minute introduction to Flow
I will quickly introduce you to the very basics of Flow through developer lenses, so feel free to skip this if you know how Flow works.
Flow is a decentralized blockchain introducing a new approach to scaling by having multiple single-purpose nodes (execution node, collection node, access node, etc.). The access node is the one that interests us since it gives us a way to access the Flow network by connecting to its APIs but doesn't worry; we have libraries that ease the communication with the node.
Communicating with the access node, we can submit new transactions, execute scripts, and get blockchain information, such as blocks, transactions, etc. You can read more about how Flow works here, but this knowledge is optional for this guide. Interacting with Flow is possible by sending transactions containing the Cadence code calling any contract, and mutating the Flow blockchain. Think of them as "write operations." If you only need to query or "read" the blockchain, you can use scripts, which again can contain any Cadence code, but don't change the Flow network in any way, but return the information we are interested in, like calling a contract functions.
Flow also introduced its programming language called Cadence. Cadence is an excellent language for blockchain because it's resource-oriented, which guarantees that resources (a particular type) can only exist in one location at a time, cannot be copied, and cannot be accidentally lost or deleted. Check the complete Cadence language reference here, but we will cover some basics later when we write contracts.
Another unique property to Flow which makes it great is its unique account design model. Accounts are not just represented by addresses that are derived from private keys (like, for example, on Ethereum), but they are actual entities that live on the Flow network, meaning, you can create a new account on the network by calling a function and assign any key to it, you can even completely change the keys as well as remove them, and then the account becomes read-only.
Accounts give you more power for delegation of access compared to other networks. Account has its storage where you can very cheaply store any data (currently 1MB for 0.01 Flow). You can read more about Flow's key components here.
Flow even introduces a way for walletless onboarding, which is another article's topic.
There currently are multiple Flow networks available for different purposes. You can access those networks through access node APIs (currently gRPC and HTTP APIs, but don't worry about those since SDKs support them). The APIs are available on different addresses:
- Emulator APIs [localhost:3569](<http://localhost:3569>) - locally run Flow network using the emulator tool
- Testnet APIs [access.devnet.nodes.onflow.org:9000](<http://access.devnet.nodes.onflow.org:9000>) - testnet is used for testing your application, similar to how staging is in web2 world,****
- Mainnet APIs [access.mainnet.nodes.onflow.org:9000](<http://access.mainnet.nodes.onflow.org:9000>) - mainnet is the production Flow network****
Flow tools and technologies
Building on Flow can be accessed using different technologies we provide, so we will look at some of the most common ones, but keep in mind there's more you can freely choose from.
JS FCL
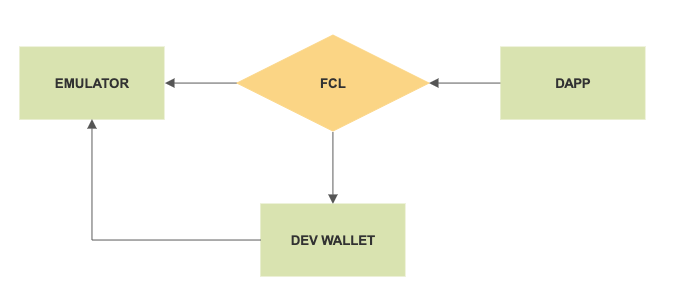
In writing a javascript application, we can use the JS FCL SDK, simply a Flow javascript SDK. It allows us to interact with the Flow network by sending transactions, executing scripts, reading blocks and events, and more. Still, since most applications want to send transactions to alter the Flow blockchain data, they must somehow sign those transactions. If you are coming from Ethereum, you know this problem was solved by using different wallets like Metamask on Flow, however, we found a better solution, and it's already built into the FCL SDK for you. The SDK knows how to connect to available wallet providers and asks the user to confirm the signing of the transaction with the modal you saw earlier in the demo. This is possible by wallet discovery protocol, and you can read more about it here, but for now, you don't have to worry too much about it; think of it as an OAuth for Flow.
Of course, to allow users to sign in, they need to have an existing wallet with the chosen provider. As explained below, we simulated this wallet provider during development with the dev wallet. You can find the complete FCL reference here. In summary, if you're building a frontend for your dApp, you need FCL to interact with wallets and Flow. Below is a quick schematic of how the FCL SDK communicates with all other tools, like the dev wallet and the emulator.
CLI
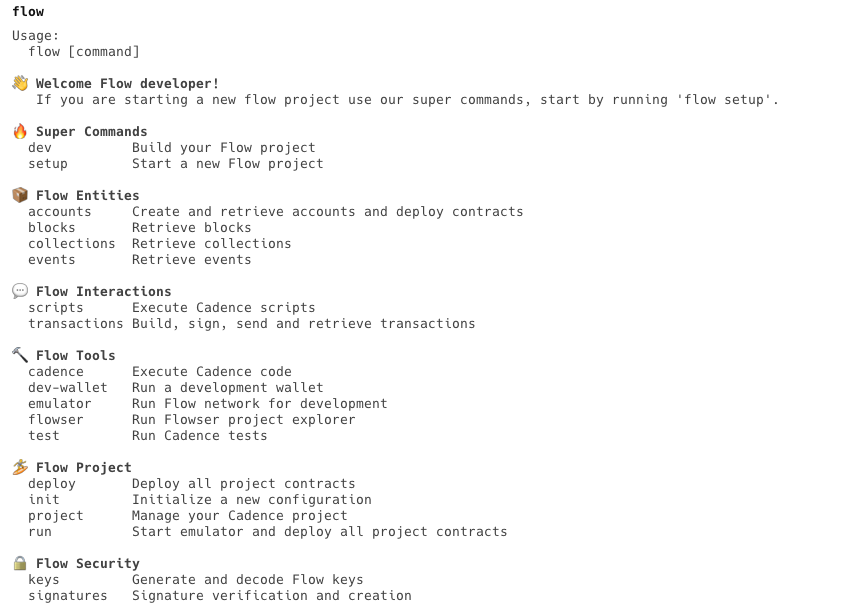
The Flow CLI is a swiss army knife when working with Flow. It offers commands to send transactions, execute scripts, and get blocks but also includes other tools like Flow emulator, dev wallet, and Flowser. It provides development tools that watch your contracts and keeps them updated automatically during development. It also knows how to resolve imports of other contracts and many more cool features you will need during your development journey.
Here's a sneak peek of the help screen:
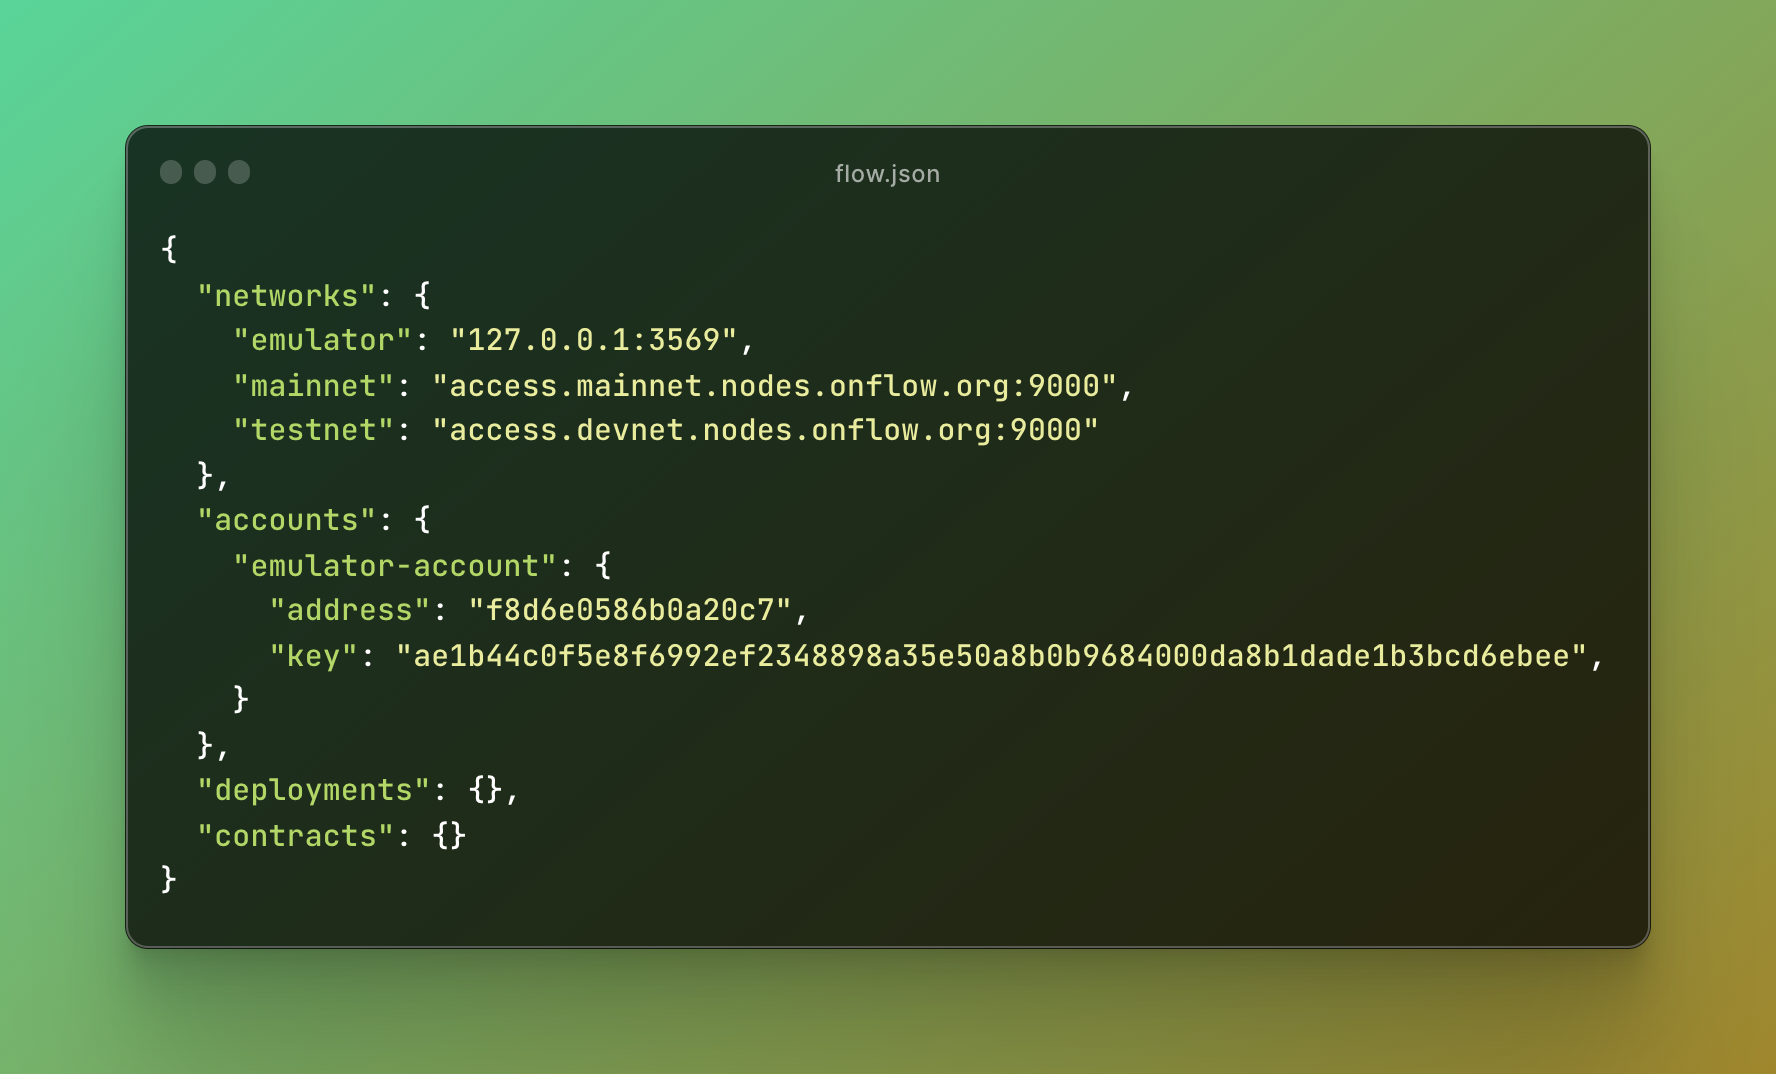
Flow.json
The flow.json file contains the configuration of your project. There, we define contracts we will deploy, accounts we created on the network, and different networks we can access. Flow.json is consumed by other tools and libraries (such as FCL) and is a glue between consumers. You can read more about flow.json here.
Example of a flow.json file:
Flow Emulator
The Flow emulator is a tool that runs a simple version of the Flow network on your local machine and can be used for development. It exposes the same Access Node APIs on the live Flow mainnet. You can quickly start the Flow emulator via Flow CLI by running the flow emulator command. Emulator provides an output where you can see transactions it executes and different logs.
.png)
Dev Wallet
Dev wallet is a tool that emulates an FCL-compatible wallet locally. It implements specific APIs the FCL needs to communicate with it and sign the transactions. The dev wallet automatically generates a wallet you can use during development. For now, you can think of it as a black box tool that enables you to sign any transaction as a user would on production deployment. Of course, on production, the dev wallet would be replaced with any production wallet providers such as Blocto or Lilico wallet.

Flowser
Flowser is an excellent GUI tool to visualize the Flow emulator blockchain. It makes the development more straightforward because it allows you to inspect what is going on the network, and you can think of it as the graphical interface to your emulator, but it packs more features like account storage inspection too. You can run both the emulator and dev wallet from Flowser. Download it and learn more about it on their website https://flowser.dev/
.png)
VSCode Cadence extension
The last tool we will cover is the Visual Studio Code Cadence extension, which is the best-suited IDE to develop Cadence since the extension supports syntax highlighting, auto-completion, code inspection, and more. You can get the IDE here; the extension is available in the marketplace.
Other Tools
Many more tools and libraries built by the community can assist you during your development and are less important than the ones we covered. Learn more about them on our developer portal.
Setup a Cadence Project
We will start from scratch using the Flow CLI setup command.
This will create a new empty project folder named helloWorld and include a cadence folder as well as flow.json
Your project comes with some standard folders which have a special purpose:
- /cadence inside here is where your Cadence smart contracts code lives
- flow.json configuration file for your project, you can think of it as package.json, but you don't need to worry, flow dev command will configure it for you
Inside cadence folder you will find:
- /contracts location for Cadence contracts go in this folder
- /scripts location for Cadence scripts goes here
- /transactions location for Cadence transactions goes in this folder
- /tests all the integration tests for your dapp and Cadence tests go into this folder
You can read more about your project in the README.md that was created in the project folder, but we will cover everything here as well.
Now start up your development environment by running flowser, clicking on create a new project and choosing a name and the folder we just created, or by manually running flow emulator and flow dev-wallet in the project directory. We suggest going with the first option as it’s easier to manage.
This is what you should see:
.png)
As you can see, there are already some accounts created. The first is a service account, like an "admin" account on the Flow network, and other accounts containing pre-deployed contracts. No need to stress about it now. We can ignore it for now.
Then in your project directory, start the flow dev command, which will watch for any changes in the contracts folder and make sure they are deployed for you on the network so that you can focus your attention on the coding. We will do this by opening a project in VSCode and running flow dev in the terminal inside VSCode. Make sure you have installed the Cadence extension.
Your IDE should now look like this:
.png)
Writing your first Cadence contract
We are going to start by adding a new contract in the cadence/contracts folder named Person.cdc and with the content.
Click save, and you are done.
🎉 Congratulations, you just deployed your first contract to the Flow network.
What happened is the flow dev command you ran detected new contracts in the contracts folder and automatically deployed a contract on the emulator you are running.
Let’s make the Person contract a bit more interesting, so we can then write a script to query it and a transaction to change some data.
Add this to the contract:
What this will do is add a variable on the contract called name where we will be able to assign a value in the init method, which is the contract constructor.
💡 Hardcoding the values in the constructor is suggested during development. After you finish the contract, you should change the constructor to accept values as function parameters.
Click save again, and the contract will be automatically updated.
Scripts
Do you remember how we mentioned Flow scripts are Cadence programs that can read something from the Flow blockchain and return data but can not change things? Well, scripts will make help us now to query the contract and call sayHello() method.
Let’s write a script called sayHello.cdc and put it inside the scripts folder /cadence/scripts . Add this content in it:
This imports the deployed contract we just created by its name. Then we can call the function defined on the contract called sayHello(), which returns a String, so we return that as the script return value.
We can now test this out by executing the script using the flow CLI:
Awesome, it works! You just queried some data from the Flow blockchain. Give yourself a pat on the shoulder, and let’s continue by forever changing some data on Flow blockchain by using transactions.
Transactions
First of all, let me say we could call the same function using a transaction, but that wouldn’t accomplish much, so we want to call a function that changes something. Let’s add such a function to the Person contract. Let’s add a friendship resource and a function that creates that resource. If you want to learn about resources please check the Cadence resources documentation. Add this to the Person contract:
This way we add a new function called makeFriends() that returns a Friendship resource. Now let’s call this function in a transaction.
Add a new transaction file to the cadence/transactions folder called makeFriends.cdcAnd put this code in it:
So we defined a transaction, and if you want to read more about transactions you can here but what this will do is first import Person contract we defined and automatically deployed, then it will call the Person.makeFriends() method, which will return a resource that will directly get saved into account storage. So let’s make some friends and send a transaction using Flow CLI.
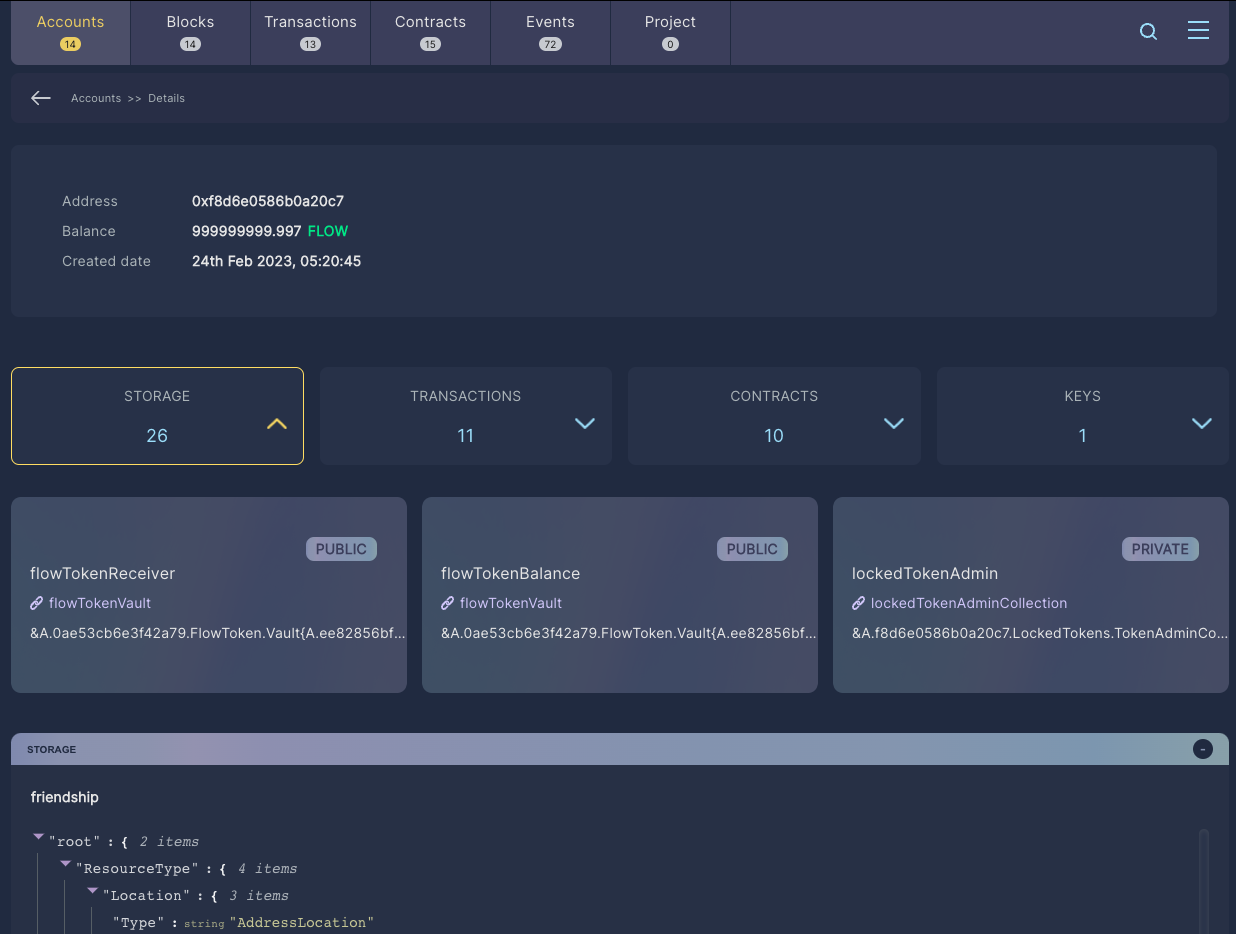
So we can see the transaction was SEALED which means it was included on the Flow blockchain. The execution was also successful otherwise we would see an error.Can we check if the resource was really saved in an account? and which account was that in the first place? So we can see the payer is f8d6e0586b0a20c7 which is the account that was used, by default, if we don’t explicitly define an account, this service account will be used. Think of it as a default admin account we always get on the emulator.
Let’s look into Flowser, find the above account, and check the storage. We can see there indeed is a “friendship” resource in the storage section.
Congrats, you change Flow blockchain forever, well until you restart your emulator. You see when the emulator is restarted the data clears. If you want to keep the emulator blockchain data between restarts you should add a --persist flag when running the emulator like so: flow emulator --persist
But let's deploy our project to the testnet and then mainnet and change the Flow blockchain forever.
Moving from Emulator to Testnet
Deploying our just-made project to testnet is not hard, but it requires from us to first create an account on testnet we can use, to deploy the contracts to.
Creating testnet account
Creating a testnet account is easy using the Flow CLI run the following command inside the project directory:
Enter a new account name and choose testnet as the network. After, you should see the above output. Please note the address in your case is gonna be different.
So we see an account was created and saved into flow.json, but its key was added to a separate file that we should never share with anyone.
Now we need to define a deployment we want to use on testnet. In our case is gonna be simple since we only have one contract, and we need that contract to get deployed on the newly created account. We run another CLI command:
So we choose testnet as the network for deployment, the name of the account we just created (alice in our case), the “Person” contract we want to deploy, and that’s it.
As it already says we can now deploy our project by running project deploy command, so let’s do that:
It says we deployed one contract on the account Alice. Congrats, we’ve just deployed a contract on testnet 🎉
Updating Contracts
What if we want to change our deployed contracts, lets say we change the accessibility of the variable name from public pub to private priv, like so:
We can easily update the contracts by adding an --updae flag to the above command like so:
We can see the “Person” contract was updated.
⚠️ Please be very careful when updating contracts, as you are limited in changes you can make to already deployed contracts on testnet, which is described in the Cadence documentation. That’s why it’s better to first iterate and develop the contract using an emulator, where we don’t have these kinds of enforcements.
Since we’ve now created a contract on testnet, we can try to interact with it using the same script and transactions as before. Good news, the command stays the same and you bearly need to change anything.
Execute the script by adding the --network testnet flag like so:
And a transaction by adding the --network testnet flag and also a signer flag set to the account we created --signer alice
We need to add the --signer flag to say which account will sign the transaction and pay for it, it doesn’t need to be the same account as the one we deployed the contract to, but it needs to be an existing testnet account, and since we created one for contract we may as well reuse it for this purpose.
🎊 Congratulations. you’ve just interacted with testnet!
Moving from Testnet to Mainnet
After you’ve successfully established a testnet environment and further test it that made you decide you are ready to go to mainnet, you can repeat a very similar process for mainnet.
❗🚨 Before we do so, couple of very important things to note:
- Creating an account on the mainnet is a simple procedure not different from the one seen for the testnet, but the account keys should be kept safe at all times. Anyone obtaining access to those keys can change the contract and exploit your application. We even suggest protecting your account by using Amazon or Google KMS for signing.
- Deploying to mainnet should be the very last action in the development process, meaning you should make sure your application works well, it’s extensively tested, and doesn’t have bugs.
Going from emulator to mainnet is like playing with clay, at first it’s very soft and can easily be changed and molded and the more you move towards mainnet more permanent it becomes. Changing the mainnet dapp is very hard and should be avoided as much as possible.
After all the disclaimers let’s create a mainnet account using the CLI:
Add a deployment:
And deploy to the mainnet using the CLI command:
You are done. You have successfully deployed your application to mainnet.
Congrats 🎊 🎉
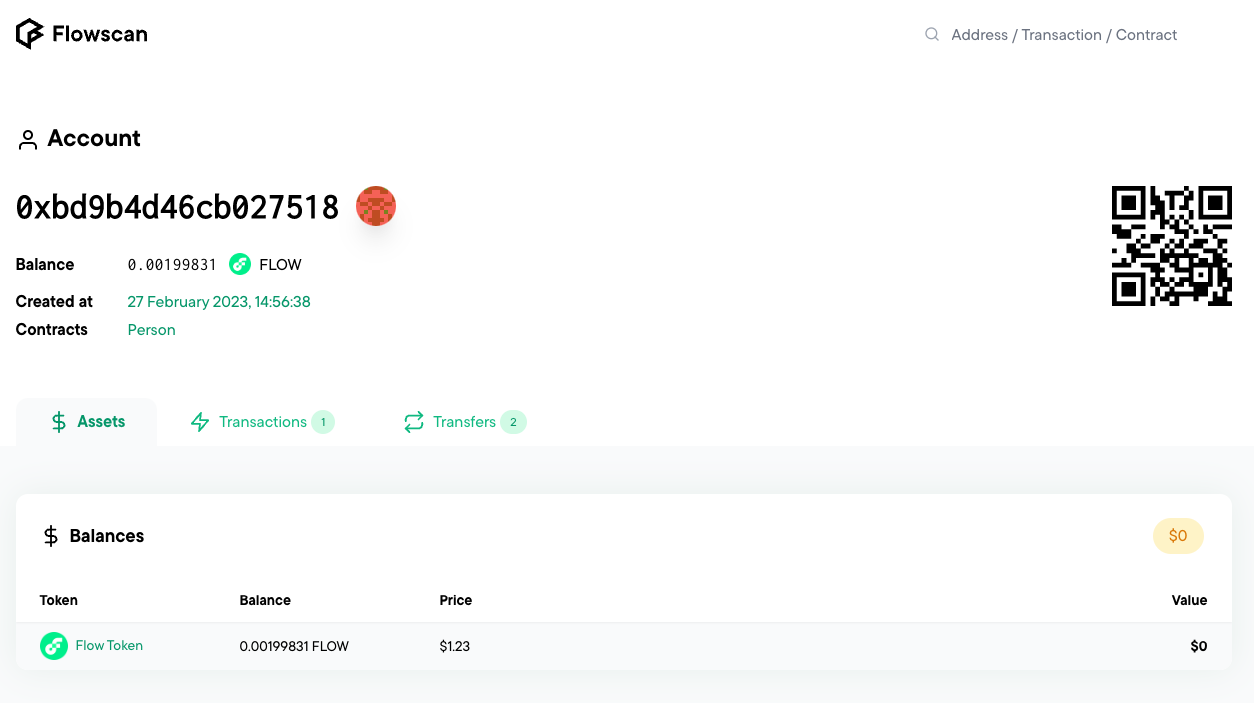
How can we check the deployment? we can use flowscan and enter the address of the account used in the deployment (the one we just created before), like so:
https://flowscan.org/account/0xbd9b4d46cb027518
And we can see it includes our contract https://flowscan.org/contract/A.bd9b4d46cb027518.Person
